
A Lightning-Fast Game Dev Environment: C++ and SDL Setup Guide
A simple, fast game dev environment that works for Windows, Linux and Mac.

Here’s the brutal truth: You’re not a true game dev if you’ve never developed a game using C++.
“Whoa, Yorch, take it easy. There are thousands of game devs out there making good money using commercial engines for their games”.
Sure, but that’s why modern gaming is filled with unoptimized, bloated slop. Modern game development is packed with ‘artsy’ dudes who never take the time to optimize their work.
They jump directly into Unity or Unreal expecting to have immediate results, only to be immersed in a hand-holding environment that will inevitably lead to an unoptimized mess because they never took the time to understand how an engine works. How memory really works under the hood. How to craft a tight game loop from scratch. How to squeeze every bit of performance without layers of abstraction slowing things down.
Over time, that can lead to games that look flashy but feel sluggish, tied to engine updates, licensing quirks, or black-box systems you don’t fully control.
Even worse, they remain tied to the will of the companies
Sure, you may release a game that sells decently, but you’ll be just one more out of the millions of game devs who have no idea how to create their own engine, even a small one.
Setting up a C++ dev environment may sound intimidating at first, but trust me. This guide will feel like a breeze. You’ll have a lightning-fast dev environment, and you’ll be ahead of the curve of all those normies using commercial engines. The best part? You’ll own every single aspect of your code. Forever.
That’s one of the many benefits of learning how to create games with C++ and SDL.
Let’s get started.
Reminder: you can support my mission to fix gaming and get tons of members-only content for a few dollars per month:
Full-length articles every week.
Starting threads in the community chat.
Weekly tutorials on game dev and game design.
The entire archive of game design, game dev and marketing breakdowns.
The Code Editor
Visual Studio Code is the recommended tool. Sure, it’s a Microsoft open-source project, but the editor has matured into a phenomenal tool filled with extensions and functionality.
You can customize to suit your needs, and, if you’re curious enough, you could even take a look at its source code and eventually create extensions for it.
But, we’re focused on game dev.
Download it for the OS of your choosing: Windows, Linux or Mac and get the party started.
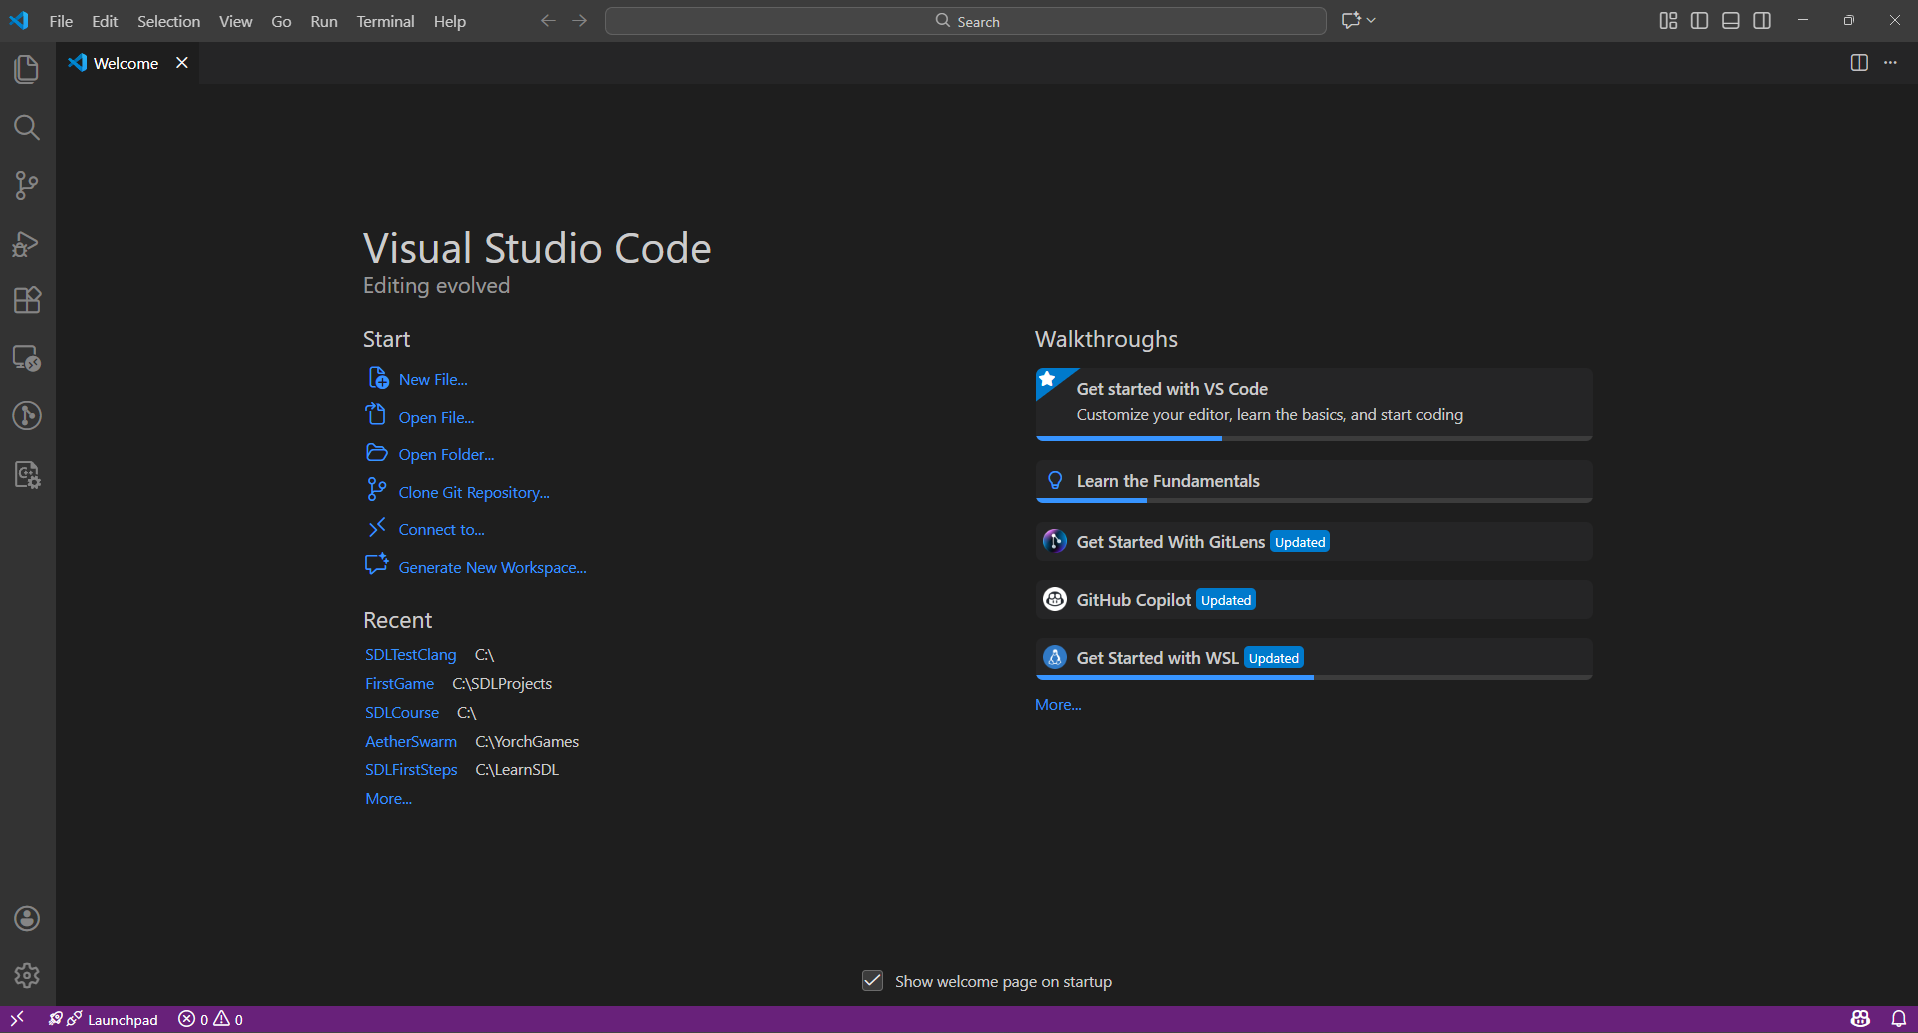
Once you install Visual Studio, open it directly from your desktop or open a Powershell/Terminal session and type code . in a folder of your choosing.
It will automatically open VS Code.
You should see a welcome screen similar to the one below:
Now go to extensions on the left side menu and install the C/C++ for Visual Studio Code extension:

This extension adds C/C++ editing with Intellisense and debugging features to your coding environment.
The Compiler
Visual Studio Code alone can’t compile C++. You need a compiler to turn your code into an executable.
There are many options out there, with GNU/gcc being one of the most popular.
But I recommend Clang for its speed and ease of use. It’s part of the LLVM project offering faster diagnostics, and better error messages. It just feels snappier than the alternatives.
If you’re on Windows, head to the official LLVM releases on GitHub and grab the latest Windows installer. You can look for its link under the Links section in this guide, all the way to the bottom.

Extract it and run. Make sure to check the box to add LLVM to your PATH during installation.
If you’re on Mac, fire up Homebrew and run:brew install llvm
Then add it to your PATH if needed (brew usually tells you how).
If you’re on Linux, use your preferred package manager. For example, on Ubuntu/Debian:sudo apt install llvm clang
On Fedora: sudo dnf install clang
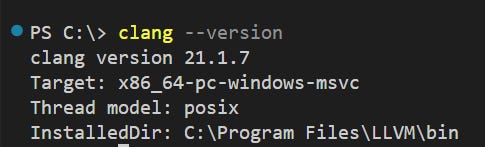
Test it in a terminal typing: clang --version. You should see the version number, that means you’re golden.
The Build Manager
This is where the real pain of raw C++ hits if you’re not smart about it.
Compiling a C++ project manually is a nightmare. Imagine you’ve got even a small game with a handful of source files like main.cpp, player.cpp, and enemy.cpp. You can’t just throw them at the compiler and call it a day.
You’ve got to compile each .cpp file individually into object files (that’s clang++ -c main.cpp, clang++ -c player.cpp, and on and on), then link them all together with something like clang++ main.o player.o enemy.o -o mygame.
You missed a dependency? Boom, linker errors.
Add a new file? Rinse and repeat the whole mess.
Scale that to a real project with dozens or hundreds of files, headers, libraries like SDL, and cross-platform tweaks? You’re talking hours wasted on tedious command-line shenanigans for every build.
It’s error-prone, non-portable spaghetti that normies in Unity never deal with because their engine babysits them.
But you? You’re building like a real G, so we use CMake.
CMake generates build files for whatever system you’re on (Makefiles on Linux, Visual Studio projects on Windows, Xcode on Mac), handles dependencies with ellegance by auto-detecting headers and libs, and scales from tiny projects to massive engines. It’s highly effective and a GREAT skill to have in this day and age.
The best thing about CMake + SDL with C++ is that you can code your game once, update the CMakeLists.txt file for the platform of your choice, run it, and now you’ll have a build for every platform out there: Windows, Linux or Mac.
Windows: Download the installer from cmake.org. Run it, add to PATH.
Mac: brew install cmake
Linux: sudo apt install cmake or sudo dnf install cmake
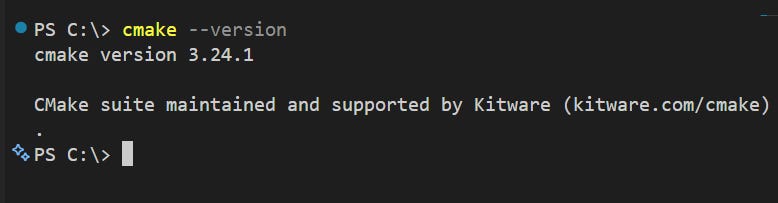
Make sure CMake has been properly installed by typing cmake --version on a terminal window:
Oh, and one more thing. CMake scans your code, figures out what changed, and only recompiles what’s needed. It’s a beauty.
The Build Manager Optimizer
CMake is great at generating builds, but its default generators (like Make on Linux or VS on Windows) can be slow. Enter Ninja: a build system designed for speed.
Here’s how to install Ninja:
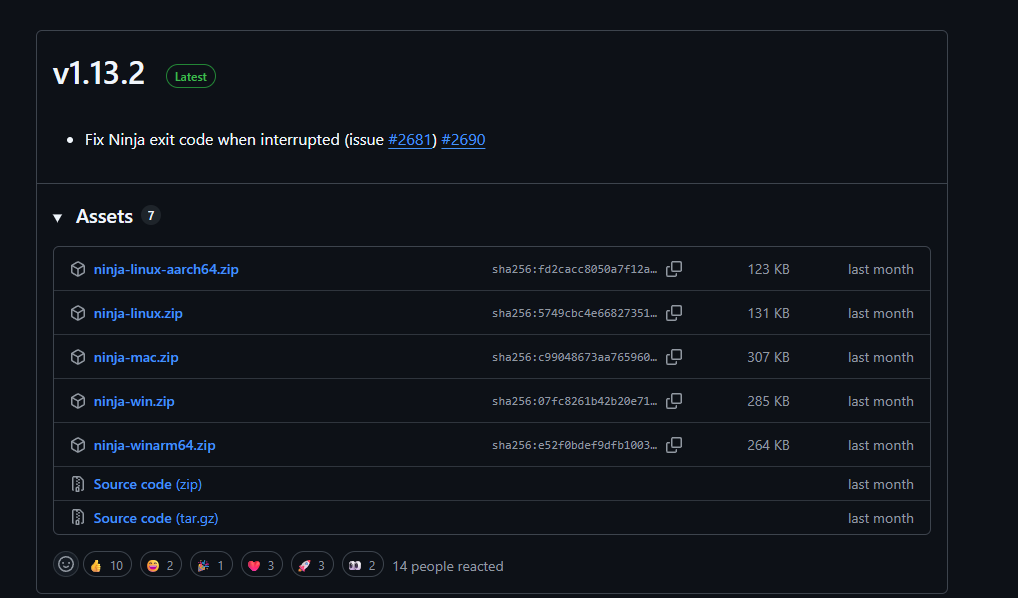
Windows: Download from GitHub releases.
Mac: brew install ninja
Linux: sudo apt install ninja-build (or use your favorite package manager).
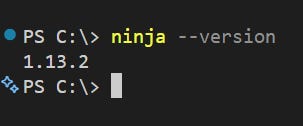
Verify the installation was successful by typing ninja --version
And of course SDL
You got Visual Studio Code, the Clang compiler, and CMake + Ninja for your builds, but you’re still missing a vital piece for game development, SDL.
SDL (Simple DirectMedia Layer) is the legendary low-level library that handles all the dirty work associated to game development: opening game windows, handling input from keyboard/mouse/gamepad, playing audio, and pushing pixels to the screen regardless of your operating system.
It’s mature, battle-tested, lightweight, and gives you direct control that Unity devs can only dream about. Best part? It works flawlessly on Windows, Mac, Linux, and yes, with the right licensing, you can even target PlayStation 5, Xbox Series X|S, and Nintendo Switch 2.
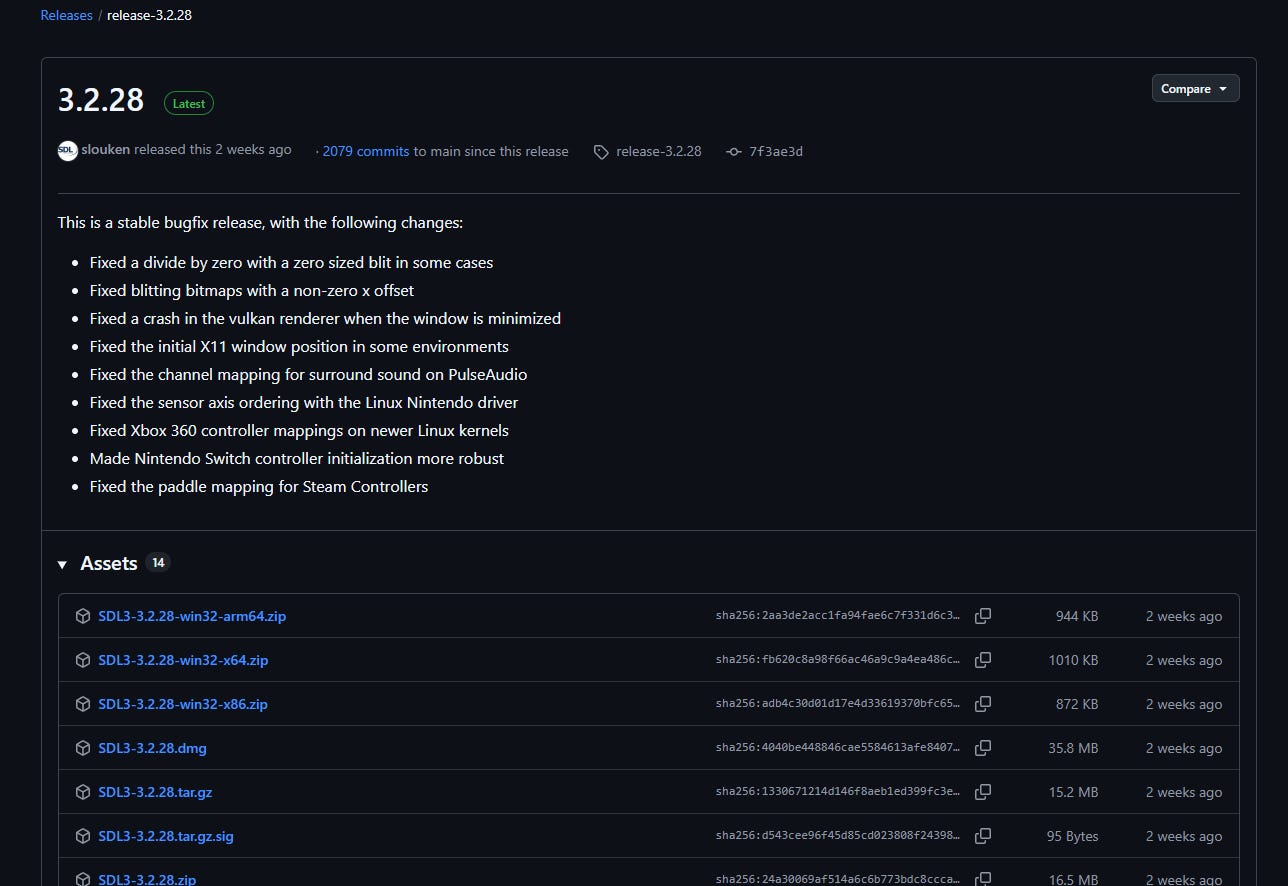
To install it go to the official github repo (check the Links section at the bottom of this guide) and get the version for the OS you’re working. I recommend these versions.
Windows: SDL3-devel-3.2.28-VC.zip. Extract it and add it to a folder in your main directory. For convention, save it under C:/SDL3
Linux: SDL3-3.2.28.tar.gz or use sudo apt install libsdl3-dev
Mac: SDL3-3.2.28.dmg or use brew install sdl3
It’s important to mention that SDL is a LIBRARY, it’s not an executable file. It contains all the headers and code needed for you to start creating your own games.
We will include in our first game project in the next section.
Setting Up Everything
Now that we have everything we need it’s time to create our very first game.
Sure, it may be simple, but it’s the first step in a highly rewarding journey.
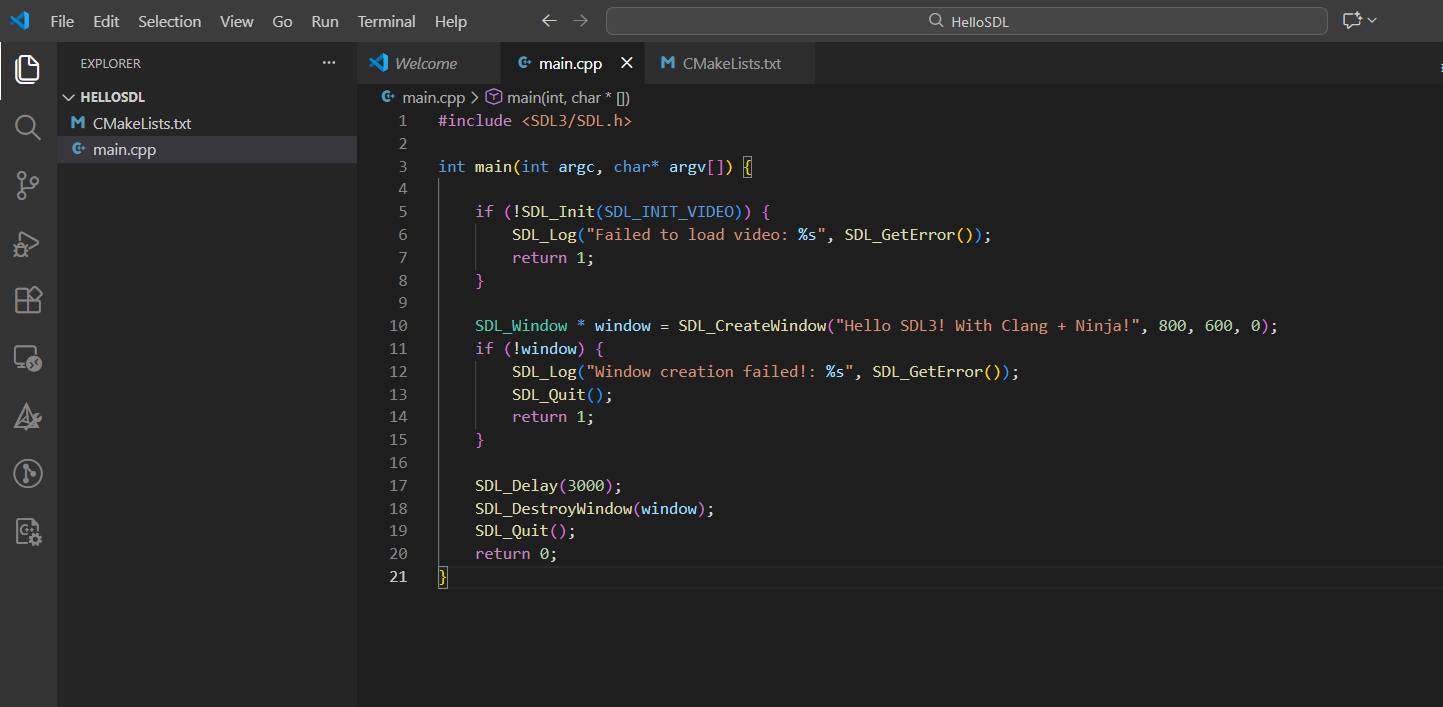
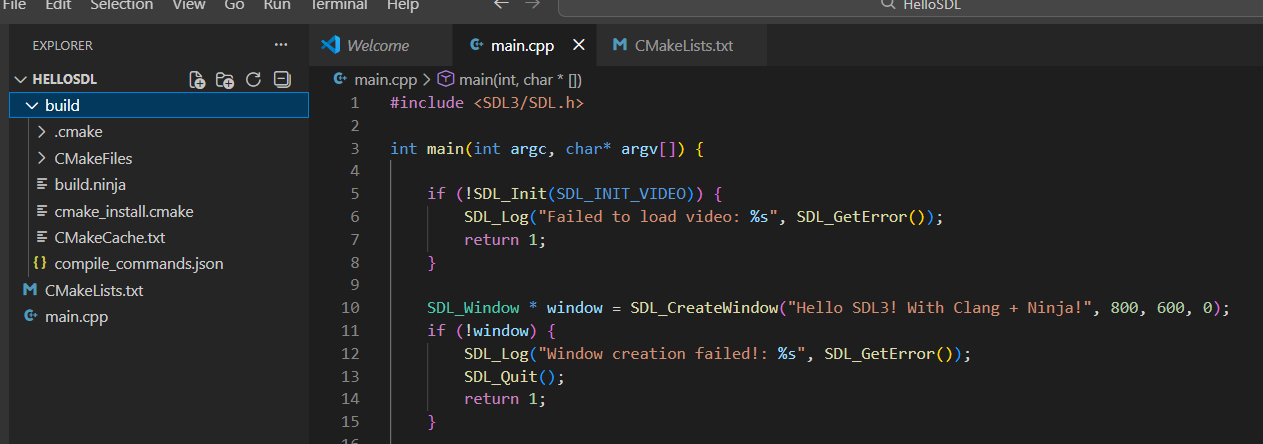
Open Visual Studio Code, create a new folder, name it HelloSDL and create a main.cpp file.
Add the code below starting on line 1 (#include <SDL3/SDL.h>). Don’t worry about the Unicode disclaimer, it comes from GitHub’s gist. Click on the raw button at the bottom right corner of the Gist below if you can’t copy it directly, and copy the code from them.
Bonus points if you type this code by yourself while taking mental notes on what you think each line is doing.
| #include <SDL3/SDL.h> | |
| int main(int argc, char* argv[]) { | |
| if (!SDL_Init(SDL_INIT_VIDEO)) { | |
| SDL_Log("Failed to load video: %s", SDL_GetError()); | |
| return 1; | |
| } | |
| SDL_Window * window = SDL_CreateWindow("Hello SDL3! With Clang + Ninja!", 800, 600, 0); | |
| if (!window) { | |
| SDL_Log("Window creation failed!: %s", SDL_GetError()); | |
| SDL_Quit(); | |
| return 1; | |
| } | |
| SDL_Delay(3000); | |
| SDL_DestroyWindow(window); | |
| SDL_Quit(); | |
| return 0; | |
| } |
You may see a compiler error next to the #include <SDL3/SDL.h> line. Don’t worry. The next step will resolve any linking issues with other libraries like SDL3.
Create a CMakeListsFile.txt under the same folder. Install any CMake extensions VS Code may recommend you.
Windows:
Add the following code, as it is:
cmake_minimum_required(VERSION 3.22)
project(HelloSDL LANGUAGES C CXX)

set(CMAKE_CXX_STANDARD 20)
set(CMAKE_CXX_STANDARD_REQUIRED ON)

set(SDL3_DIR “C:/SDL3” CACHE PATH “Path to extracted SDL3-dev-x.zip”)

list(APPEND CMAKE_PREFIX_PATH “${SDL3_DIR}”)

find_package(SDL3 REQUIRED)
add_executable(${PROJECT_NAME} main.cpp)
target_link_libraries(${PROJECT_NAME} PRIVATE SDL3::SDL3)
Linux:
cmake_minimum_required(VERSION 3.22)
project(HelloSDL LANGUAGES C CXX)

set(CMAKE_CXX_STANDARD 20)
set(CMAKE_CXX_STANDARD_REQUIRED ON)

# On Linux, after installing SDL3 with your package manager,
# find_package can locate it automatically – no manual paths needed!
find_package(SDL3 REQUIRED)

add_executable(${PROJECT_NAME} main.cpp)

target_link_libraries(${PROJECT_NAME} PRIVATE SDL3::SDL3)
Mac:
cmake_minimum_required(VERSION 3.22)

project(HelloSDL LANGUAGES C CXX)

set(CMAKE_CXX_STANDARD 20)
set(CMAKE_CXX_STANDARD_REQUIRED ON)

# On macOS with Homebrew, find_package can locate SDL3 automatically
find_package(SDL3 REQUIRED)

add_executable(${PROJECT_NAME} main.cpp)

target_link_libraries(${PROJECT_NAME} PRIVATE SDL3::SDL3)
As you can see in the CMakeLists.txt file we’re finding the SDL3 library and linking it to our project.
Your VS Code environment should look like this:
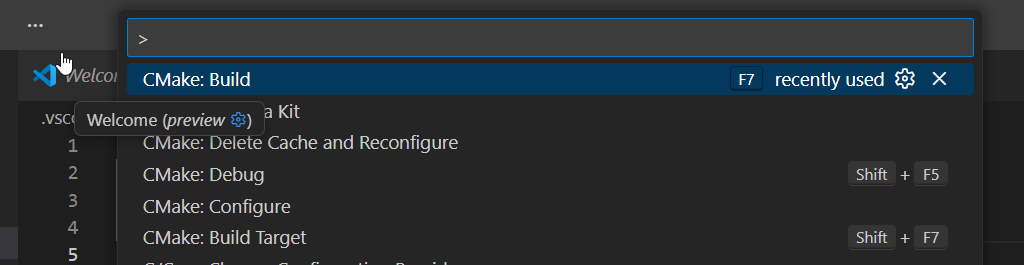
To run CMake and build the project press Ctrl + Shift + P to open the VS Code Command Palette.
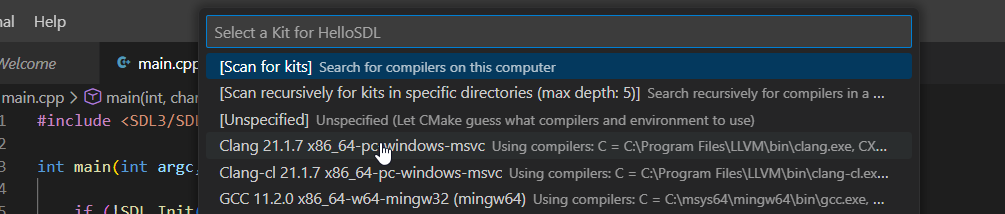
Click on CMake: Select a Kit.
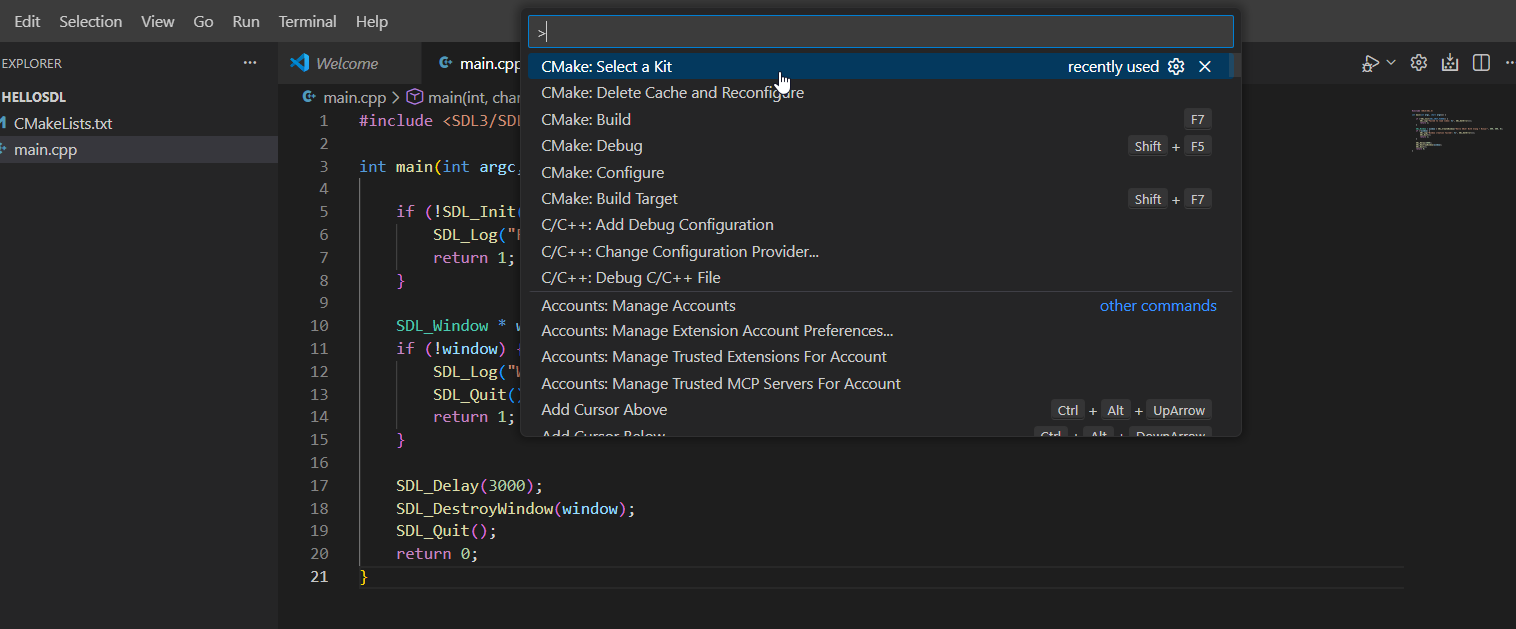
Choose Clang.
In the output terminal you may see the following:
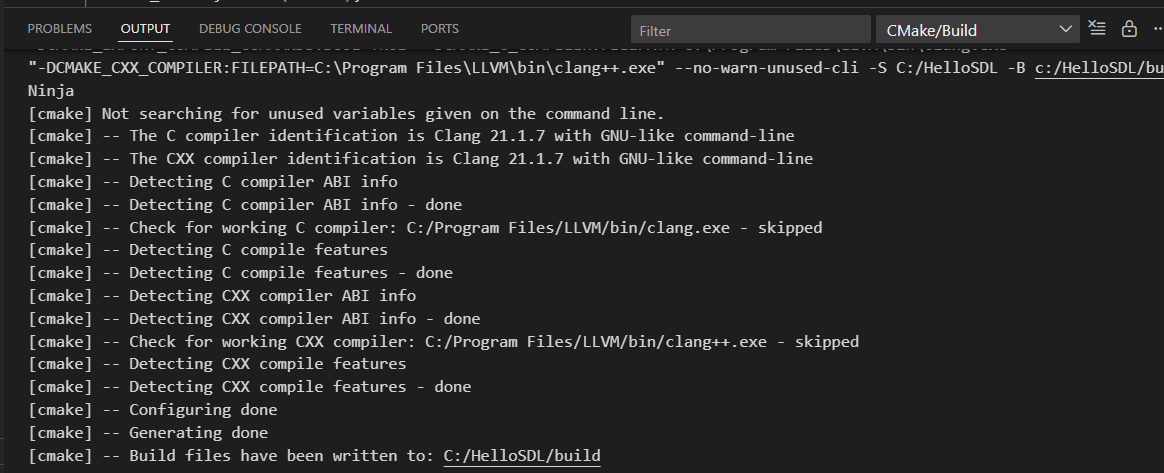
That means CMake has built your project!
Take a look at the last line. It reads: “Build files have been written to: C:/HelloSDL/Build”. The path in this message may differ depending on your operating system.
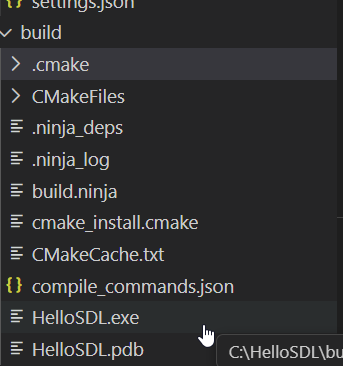
Verify that the Build folder exists under the VS Code Explorer.
You may ask yourself: I see that CMake built my project, but where’s Ninja and how can I create a binary file to run that code?!
Here’s the answer to that.
Create a folder named .vscode and add one last file inside it called settings.json
Add this:
{
    “cmake.generator”: “Ninja”,
    “cmake.configureOnOpen”: true,
    “cmake.buildDirectory”: “${workspaceFolder}/build”
}
You’re now telling VS Code to use Ninja as your cmake generator. If VS Code is complaining about the JSON format, just type it manually.
Save the file.
Open the COmmand Palette again and click CMake: Build
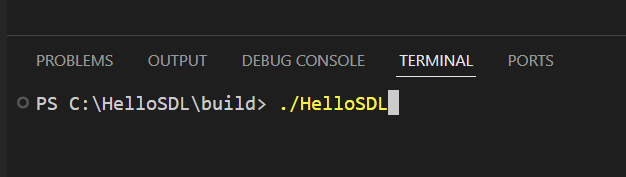
You’ll see this terminal output:

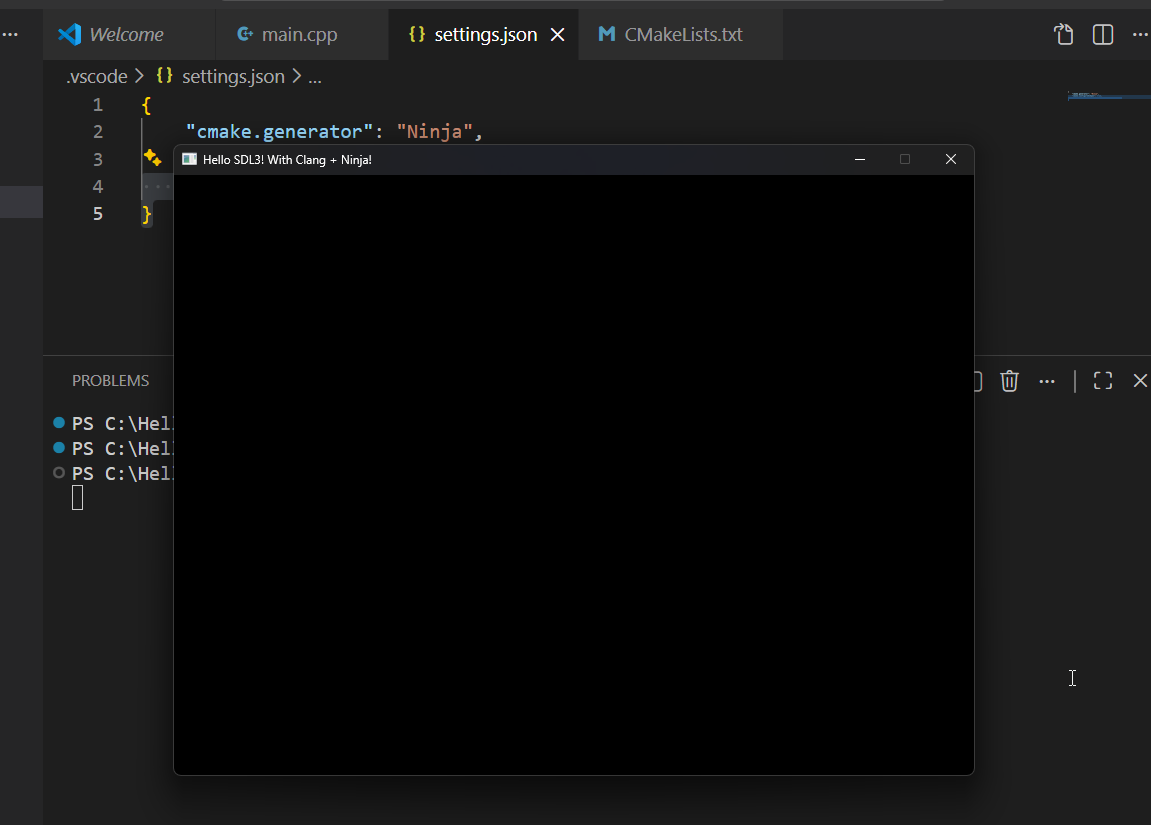
And there you have! Your first game binary. (it’s .exe for me since I’m using Windows).
In your terminal go to the build folder inside your HelloSDL project and run HelloSDL.
You should see this window opened. That’s your first game Window!!
You know have everything you need to start creating memorable games with a code that you own forever, and it’s highly optimized!
Feel free to ask me any questions over the chat or send me a DM over X.
Join Today
If you enjoyed this guide, and want to learn how to fix gaming while building your own game studio make sure to subscribe to my Substack.
You’ll learn more about the game industry, game design, how to build an audience online, create games, and sell them.
Free subscribers get ocasional articles about everything happening in gaming from a game dev and marketing perspective, access to the community chat, plus a monthly list of must-play gems.
Paid subscribers get deep-dive articles and guides on game dev, marketing and how to grow your social media presence. You can start threads on the community chat and get exclusive game design analysis of the best retro and indie titles.
And much, much more.
Subscribe today!
Links
Here are the links to every repo mentioned in the article:
Got any questions? Feel free to reach out here on Substack via comments, chat or via X DMs.
Enjoy and have FUN!
This guide is phenominal! The cross-platfrom approach with CMake and SDL is exactly what the indie scene needs right now. Most Unity devs dunno what they're missing by not learning the fundamentals. Your breakdown of the build pipeline realy demystifies the whole process
I don't mind engines as a tool, since I'm currently learning Unity to get started with. However to your point on optimizations, yeah it is a problem. There are so many bad tutorials using outdated methods. It's no wonder so many Unity devs are bad considering the poor teaching resources out there.