
Git For Game Devs
Because it's always a good idea to keep track of your changes.

Game devs love to experiment.
After all, great gameplay comes from experimentation.
But experimentation has a dark side.
You’re tweaking movement speed and swapping sprites at the same time, and now you don’t know which change broke the feel.
You adjust a collision shape, improve it, then start wondering if the original was actually better.
You vibe code an enemy behavior, it clicks perfectly, you get excited and keep going, but somewhere along the way your AI logic wrecks the entire game loop.
You don’t know what changed. You can’t go back. It’s frustrating.
That’s where version control comes in, and git is the perfect tool for the job.
Let’s look at how to get started with Git for game dev.
Reminder: you can support this Substack to fix gaming, and get tons of members-only content for a few dollars per month:
Game dev tutorials
Full-length articles every week.
Starting threads in the community chat.
The entire archive of game design and marketing breakdowns.
Weekly articles on game design and how to build an audience online.
Quick Intro: What is Git?
Git is a version control system, a tool that tracks changes to files over time.
It was originally built for software developers, but it works on any kind of text file, and with the right setup, it even handles game assets which is a blessing once you have to juggle between dozens of spritesheets, tilesets and project files.
The core idea is simple: you’re building a timeline of your project.
You take a snapshot every time you hit a meaningful milestone.
You implemented a mechanic? You take a snapshot.
You fixed a bug? Take a snapshot.
You added a new enemy sprite? You guessed it, you take a snapshot.
Git calls these snapshots commits.
You can travel back to any commit at any time, and you can even create alternate timelines to experiment without fear.
You can merge those timelines back together when you’re happy with the result.
That’s it. That’s the idea behind git.

Git vs. GitHub
You may have heard about GitHub. It’s different from Git. Git is the tool itself, it runs on your computer. GitHub is a website that stores your Git repositories online. You can use Git without GitHub, but GitHub helps to shar, back up, and collaborate online.
And there’s just one last thing that’s essential for you to understand…
Local vs. Remote: The Big Picture
The most important mental model to build first is the difference between your local repository (on your machine) and a remote repository (on GitHub or GitLab’s servers).
Git becomes a bit confusing when you don’t have a clear picture about the difference between local and remote repositores.
Invest a couple of minutes watching this diagram. Try to understand it. No rush:
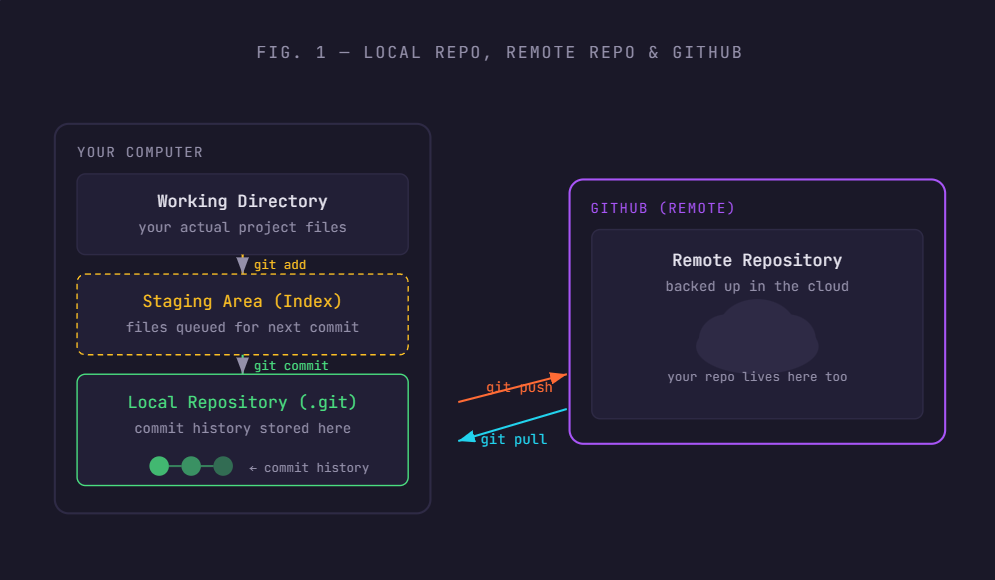
There are two main sections described in that diagram: your computer and github.
Your computer holds three key areas:
The Working Directory that is just your normal project folder and stores the files you edit every day.
The Staging Area which is a holding zone where you prepare your next snapshot or commit. The staging area is also known as the index.
The Local Repository is the
.gitfolder inside your project. It’s a hidden database that stores every commit you’ve ever made.
GitHub is a remote repository: an identical copy of your commit history stored on a server somewhere.
You push your local commits up to GitHub to back them up and share them.
You pull from GitHub to download commits that others (or you, on another machine) have pushed up.
So, you commit your changes locally, and you push them to GitHub to be stored remotely.
That’s it. It’s simple.
Setting Up Git
First, install Git.
You can go to git-scm.com and download the installer for your OS.
On Mac, you may already have it, open Terminal and type git --version to check.
On Windows, Git Bash comes bundled with the installer and gives you a nice little Linux-like terminal to work in.
Linux? Just follow the instructions from git-scm.com.
Once installed, tell Git who you are.
This info gets stamped into every commit you make:
git config --global user.name “Your Name”
git config --global user.email “you@email.com”
Next, create a free account on github.com if you don’t have one.
You’ll use this to store your remote repositories.
Are my repositories public on GitHub?
No. When creating a repot on GitHub you can specify whether that repo is public or private. Just make sure you set up MFA, and save your recovery codes someplace safe. Knowing about Security on GitHub pays large dividends in the future. It’s all about peace of mind.
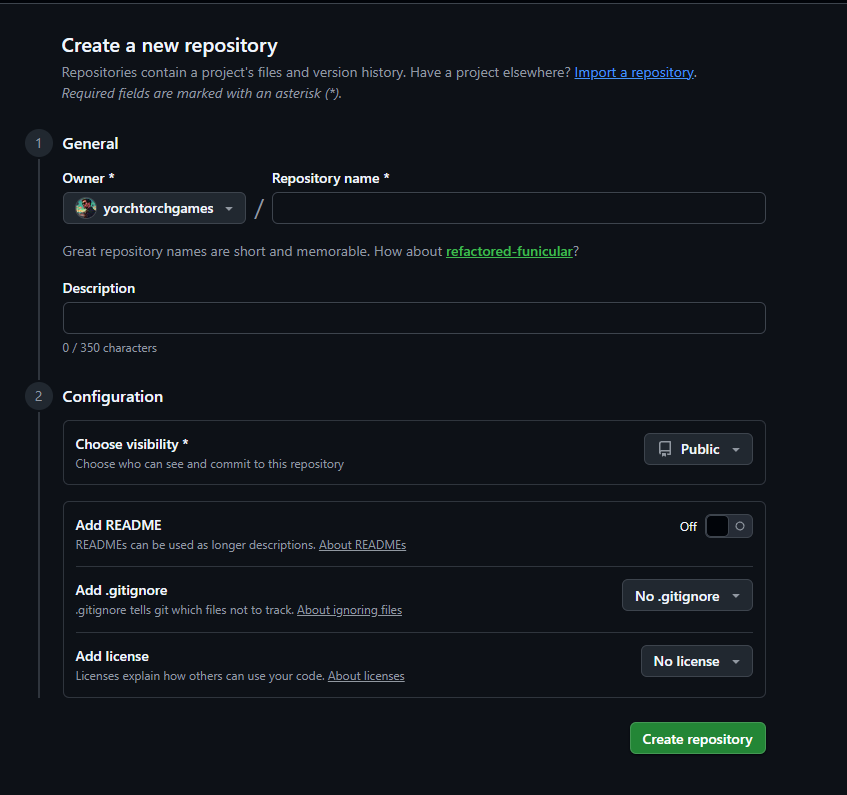
Your First Repo
Navigate into your game project folder in a terminal.
In File Explorer or Finder, right-click → “Open in Terminal” usually works.
Then run:
git initThat’s it.
Your project is now a Git repository.
The .git folder it created is the soul of your repo. Don’t delete it.
Git manages it for you.
You can now start changing your files
Making Commits
Think of a commit like a save state in a game: you're adding a new entry to an everlasting ledger that you can always return to.
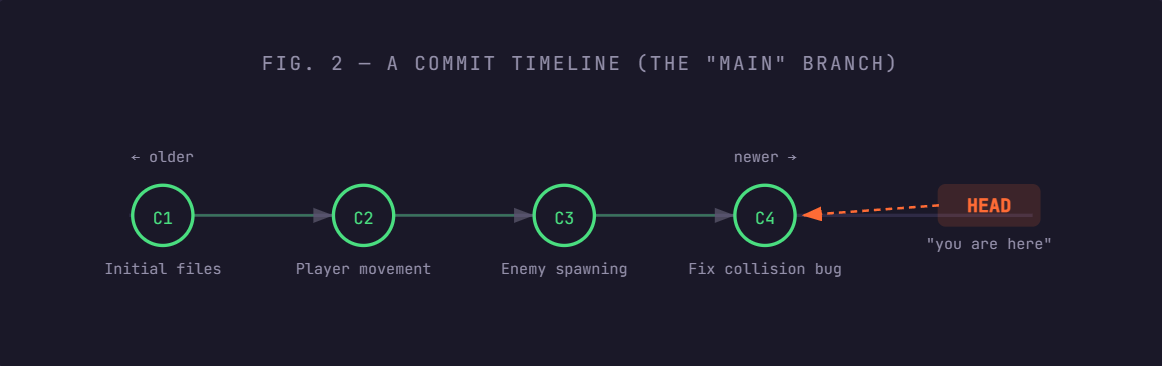
Each circle is a commit which represents a snapshot of your entire project at that moment.
HEAD is just Git's word for "where you currently are" in the timeline.
Normally HEAD points to the latest commit on your current branch.
Making a commit is a deliberate, three-stage process.
First you save your changes from your IDE or text editor, then you stage the changes you want to include, then you commit them with a message.
This intentionality lets you craft clean, logical snapshots even if your working directory is a mess.
Give it a try. Now that you initialized a git repo inside a working folder, create some code files, change them, save them and type the following in the terminal (inside your working directory):
# 1. Check what’s changed in your project
git status
  modified:   scripts/Player.gd
  modified:   scenes/Level1.tscn
  untracked:  assets/enemy_goblin.png

# 2. Stage the files you want in this commit
git add scripts/Player.gd
git add scenes/Level1.tscn
# Or stage everything at once:
git add .

# 3. Commit with a descriptive message
git commit -m “Add double jump mechanic to player controller”

# 4. Display your commits (optional)
git log
Here’s something I found over the years I’ve been using Git: It does a decent job at guiding you through many of its operations from the terminal. Make it a discipline to read every message in prints on your screen.
I personally didn’t master git by reading a book.
I mastered it by using it and learning from it.
Before moving on to the next section, keep in mind the following tips:
The .gitignore file
It’s a good idea to have a .gitignore file before your first commit, especially when working with a game project. This tells Git which files not to track, things like build output, editor temp files, and massive binary assets. Check the appendix section for Unity, Godot, Unreal and C++/SDL .gitignores. This saves you a lot of pain later. Why? Because you won’t have hundreds of library-related files that have changed with updates. It looks scary, but don’t worry. Just add a .gitignore file in your repo.
Write good commit messages
Commit messages are love letters to your future self. Write them in the imperative mood: “Add enemy pathfinding”, “Fix wall-jump clipping bug”, “Rebalance player speed”. Avoid vague messages like “stuff” or “update”. Trust me, your future you will be annoyed.
Branches Are Parallel Universes for Your Game
Branches are where Git goes from useful to epic.
A branch is an independent copy of your timeline.
You can create a new branch, experiment wildly, and then throw it away, or merge it back in to your main (or master) branch, without ever touching your stable codebase.
As a game developer, this is perfect for situations like: “I want to try procedural level generation, but I don’t want to risk breaking my hand-crafted levels.”
Create a branch, try it out, then decide.
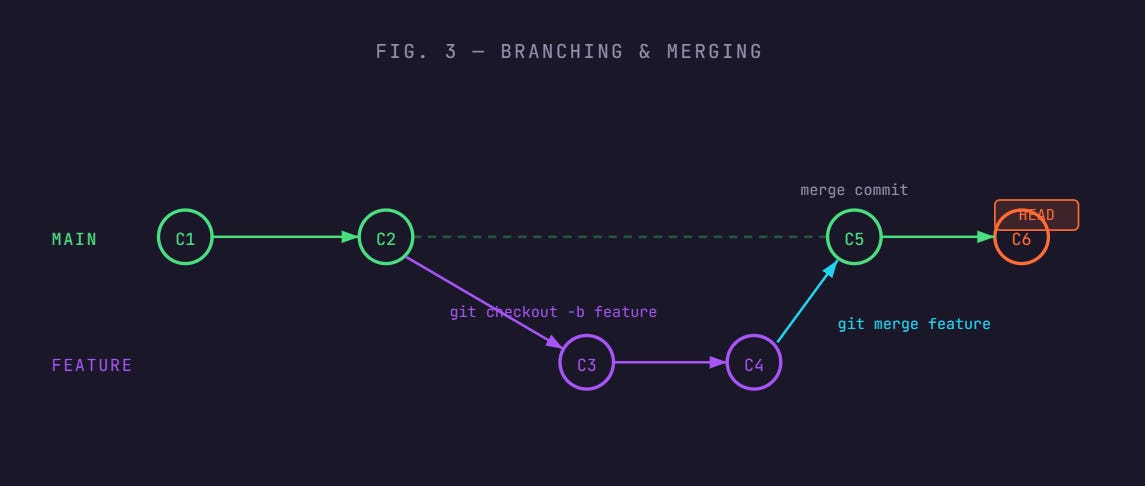
In this diagram, development was chugging along on main.
At C2, you branched off to work on a new feature (maybe procedural caves). You made commits C3 and C4 on that branch.
Then, happy with the result, you merged it back into main as commit C5, bringing in all those changes cleanly.
So, the process for branches is:
# Create and switch to a new branch
git checkout -b feature/procedural-caves

# ... make changes, add commits ...

# Switch back to main
git checkout main

# Merge the feature branch into main
git merge feature/procedural-cavesConnecting to GitHub
You’ve been working locally. Now let’s back everything up to GitHub so you have an off-site copy and can work from multiple machines.
First, sign up and create a new repository on github.com.
Choose ‘New repository’, give it a name, leave it empty (no README), and click Create.
GitHub will show you a page with setup commands.
You want the section that says “push an existing repository.”
Generally the process goes like this:
# Tell your local repo (in your terminal) where the remote lives
git remote add origin https://github.com/yourname/your-game.git

# Push your commits up for the first time
git push -u origin main
# -u sets "origin main" as the default, so next time you just:
git push
From now on, your workflow will look like this: make changes → git add . → git commit -m "..." → git push.
That's it.
Three commands and your work is safe in the cloud.
Authentication
The first time you push, GitHub will ask you to authenticate. The easiest modern approach is to use theGitHub CLI or set up an SSH key. Both are well-documented on GitHub’s official docs and take about five minutes.
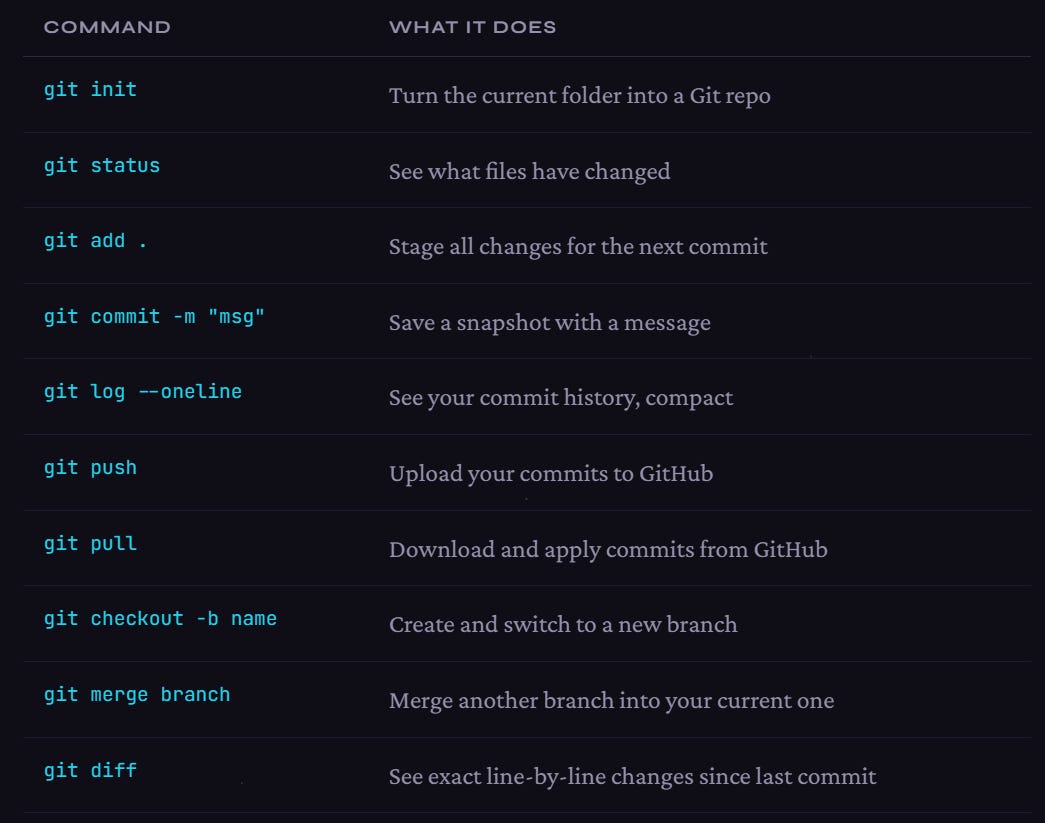
Here’s a list of useful git commands that will be part of your daily routine:
What About Game Assets?
Git was designed for text files.
Binary files (PNGs, WAVs, FBX models) can work, but they bloat your repo fast because Git stores a full copy with every change.
For large teams or large assets, look into Git LFS (Large File Storage), it stores binaries on a separate server while keeping your repo lightweight.
For solo or small 2D projects, I strongly recommend to just commit assets normally.
It’s fine.
Closing Thoughts
Git is a journey by itself, and does have a learning curve, but I highly encourage you to start playing around with creating repos, staging changes, committing them and pushing them to GitHub.
Practice and experience goes a long way here. If you ever make a mistake or want help with something, don’t worry, feel free to reach out over DM, here on Substack or X.
I’ll be more than happy to help you.
Join Today!
If you enjoyed this guide, and want to learn how to fix gaming while building your own game studio make sure to subscribe to my Substack.
You’ll learn more about the game industry, game design, how to build an audience online, which games to create and how to sell them.
Free subscribers get ocasional articles about everything happening in gaming from a game dev and marketing perspective, access to the community chat, plus a monthly list of must-play gems.
Paid subscribers get deep-dive articles and guides on game dev, marketing and how to grow your social media presence. You can start threads on the community chat and get exclusive game design analysis of the best retro and indie titles.
And much, much more.
Subscribe today!
Appendix
Git Ignore files:
Bookmarked.